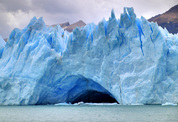
Before attempting the experiment, have a look at these videos to refresh your memory on melting.
|
|
|
This research task requires you to perform a fair test (Science Buddies, 2015).
Objective
To determine which added material will make ice melt faster.
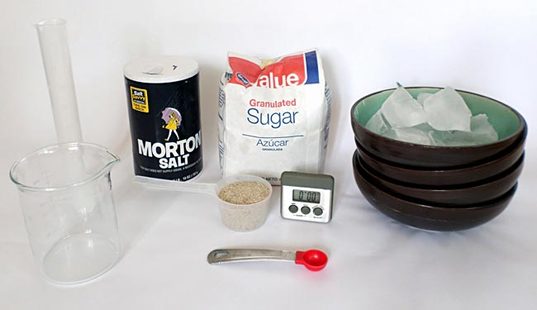
Materials
- identical bowls or saucers (4)
- ice cubes (12 - same size)
- salt (3/4 tablespoons)
- sugar (3/4 tablespoons)
- 1/4 teaspoon measuring spoon
- timer or clock
- refrigerator
- 50mL graduated cylinder (try borrowing it from your science teacher)
- measuring cup
- permanent marker
- note book
Procedure
Objective
To determine which added material will make ice melt faster.
Materials
- identical bowls or saucers (4)
- ice cubes (12 - same size)
- salt (3/4 tablespoons)
- sugar (3/4 tablespoons)
- 1/4 teaspoon measuring spoon
- timer or clock
- refrigerator
- 50mL graduated cylinder (try borrowing it from your science teacher)
- measuring cup
- permanent marker
- note book
Procedure
- Get the salt, sugar, sand, and measuring teaspoon ready to use nearby.
- Once you have set up the ice cubes in their bowls, you will want to quickly add the substances to the ice cubes so that they do not melt before adding the substances.
- Into each of the four bowls, quickly place three ice cubes. Arrange the ice cubes so that only the corners are touching, forming a triangular shape, as shown in Figure 2, below.
- Tip: If you are using ice cubes from a tray, it helps to let the tray sit at room temperature a little (for about five minutes) so that the ice cubes more easily come out of the tray and do not break into pieces.

Figure 2. Arrange three ice cubes in each bowl so that just the corners of the ice cubes touch each other.
3. Carefully sprinkle ½ teaspoon (tsp.) of salt over the ice cubes in one bowl, as shown in Figure 3, below. Then sprinkle ½ tsp. of sugar over the ice cubes in another bowl, and ½ tsp. of sand over the ice cubes in the third bowl. Do not sprinkle anything over the ice cubes in the fourth bowl — it will be your control.
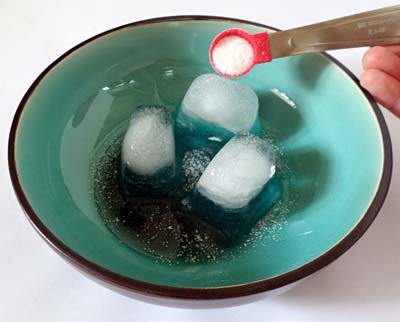
Figure 3. Sprinkle salt, sugar, sand, or nothing over the ice cubes in each bowl.
4. Move each bowl to an empty shelf in the refrigerator. If any of the ice cubes no longer form a triangular shape in their bowl, gently nudge the ice cubes to make a triangle again.
6. Check on the ice cubes every hour. When the ice cubes in one of the bowls have become at least half melted, take out all four bowls from the refrigerator and move on to step 7. (Be sure to take the bowls out before the ice cubes in two or more bowls have completely melted.)
- You are doing this experiment in the refrigerator because it is easier to see the effects of colligative properties at colder temperatures. To think about why this is, imagine melting an ice cube on a hot, paved road compared to melting it in the refrigerator. The hot temperature of the road will make all of the ice cubes melt very quickly, which makes it harder to see the relatively minor effects of colligative properties on how fast the ice cubes melt.
6. Check on the ice cubes every hour. When the ice cubes in one of the bowls have become at least half melted, take out all four bowls from the refrigerator and move on to step 7. (Be sure to take the bowls out before the ice cubes in two or more bowls have completely melted.)
- Depending on how cold your refrigerator is, it may take about four hours for the ice cubes to become at least half melted.
- While you are waiting, make a data table like Table 1 in your lab notebook.
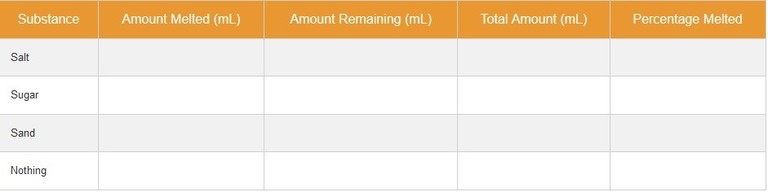
Table 1. Make a data table like this one in your lab notebook to record your results in. Note that the liquid measurements should be recorded in milliliters (mL).
7. Carefully pour the liquid water from one of the bowls into a cup with a spout, such as a large measuring cup. Make sure the ice cubes stay in the bowl, but get as much liquid into the cup as possible. Then carefully pour the liquid from the cup into the graduated cylinder. Record how much liquid was in the bowl (the amount of ice melted) in the data table in your lab notebook. After recording your results, clean out and dry the cup and graduated cylinder.
10. Calculate the total amount of water (originally in ice cube form) that was in each bowl. To do this, add the "amount melted" to the "amount remaining" for each bowl. Record the total amount for each bowl in your data table.
13. Did any of the substances you tested consistently speed up the melting of the ice (compared to the melting rate of plain ice cubes with nothing added)? If so, can you explain your results?
- Alternatively, you could use a funnel instead of a cup with a spout and funnel the liquid directly into the graduated cylinder from the bowl.
- When pouring the liquid from the bowl with the sand, try to leave as much sand in the bowl as possible.
10. Calculate the total amount of water (originally in ice cube form) that was in each bowl. To do this, add the "amount melted" to the "amount remaining" for each bowl. Record the total amount for each bowl in your data table.
- For example, if the amount melted was 65 mL and the amount remaining was 25 mL, the total amount would be 90 mL.
- For example, if 65 mL was melted, and the total amount was 90 mL, dividing 65 mL by 90 mL would give you 0.72, which is the same as 72%. This means that 72% of the ice melted.
13. Did any of the substances you tested consistently speed up the melting of the ice (compared to the melting rate of plain ice cubes with nothing added)? If so, can you explain your results?
